Progressive Web Apps with Angular: Part 2 - Lazy Loading
To explore how to add lazy loading functionality to an Angular app, this article will go through the process of building a relatively small application called Tour of Thrones.

An API of Ice and Fire (an unofficial, community-built API for Game of Thrones) will be used to list houses from the book series and provide information about them. While building this application, we’ll explore a number of topics including:
- Getting started with Angular CLI
- Lazy loading on scroll
- Lazy loading on route change
- Secondary routes
Getting Started
If you have the required Node and NPM versions, you can install Angular CLI with the following command:
npm install -g @angular/cliYou can then create a new application with:
ng new tour-of-thronesIf you have Angular CLI 7 installed or a later version, you should see a few questions pop up in your terminal:
? Would you like to add Angular routing? No
? Which stylesheet format would you like to use?
  CSS
❯ SCSS   [ http://sass-lang.com   ]
  SASS   [ http://sass-lang.com   ]
  LESS   [ http://lesscss.org     ]
  Stylus [ http://stylus-lang.com ]
You can say No to Angular routing for now. We’ll include it manually when we begin to add routing to the application.
Feel free to select whichever stylesheet format you prefer. If you would like to copy over all the styles in this article however, select SCSS.
To start the app:
cd tour-of-thrones
npm start
You should now see Angular’s version of “Hello World”.

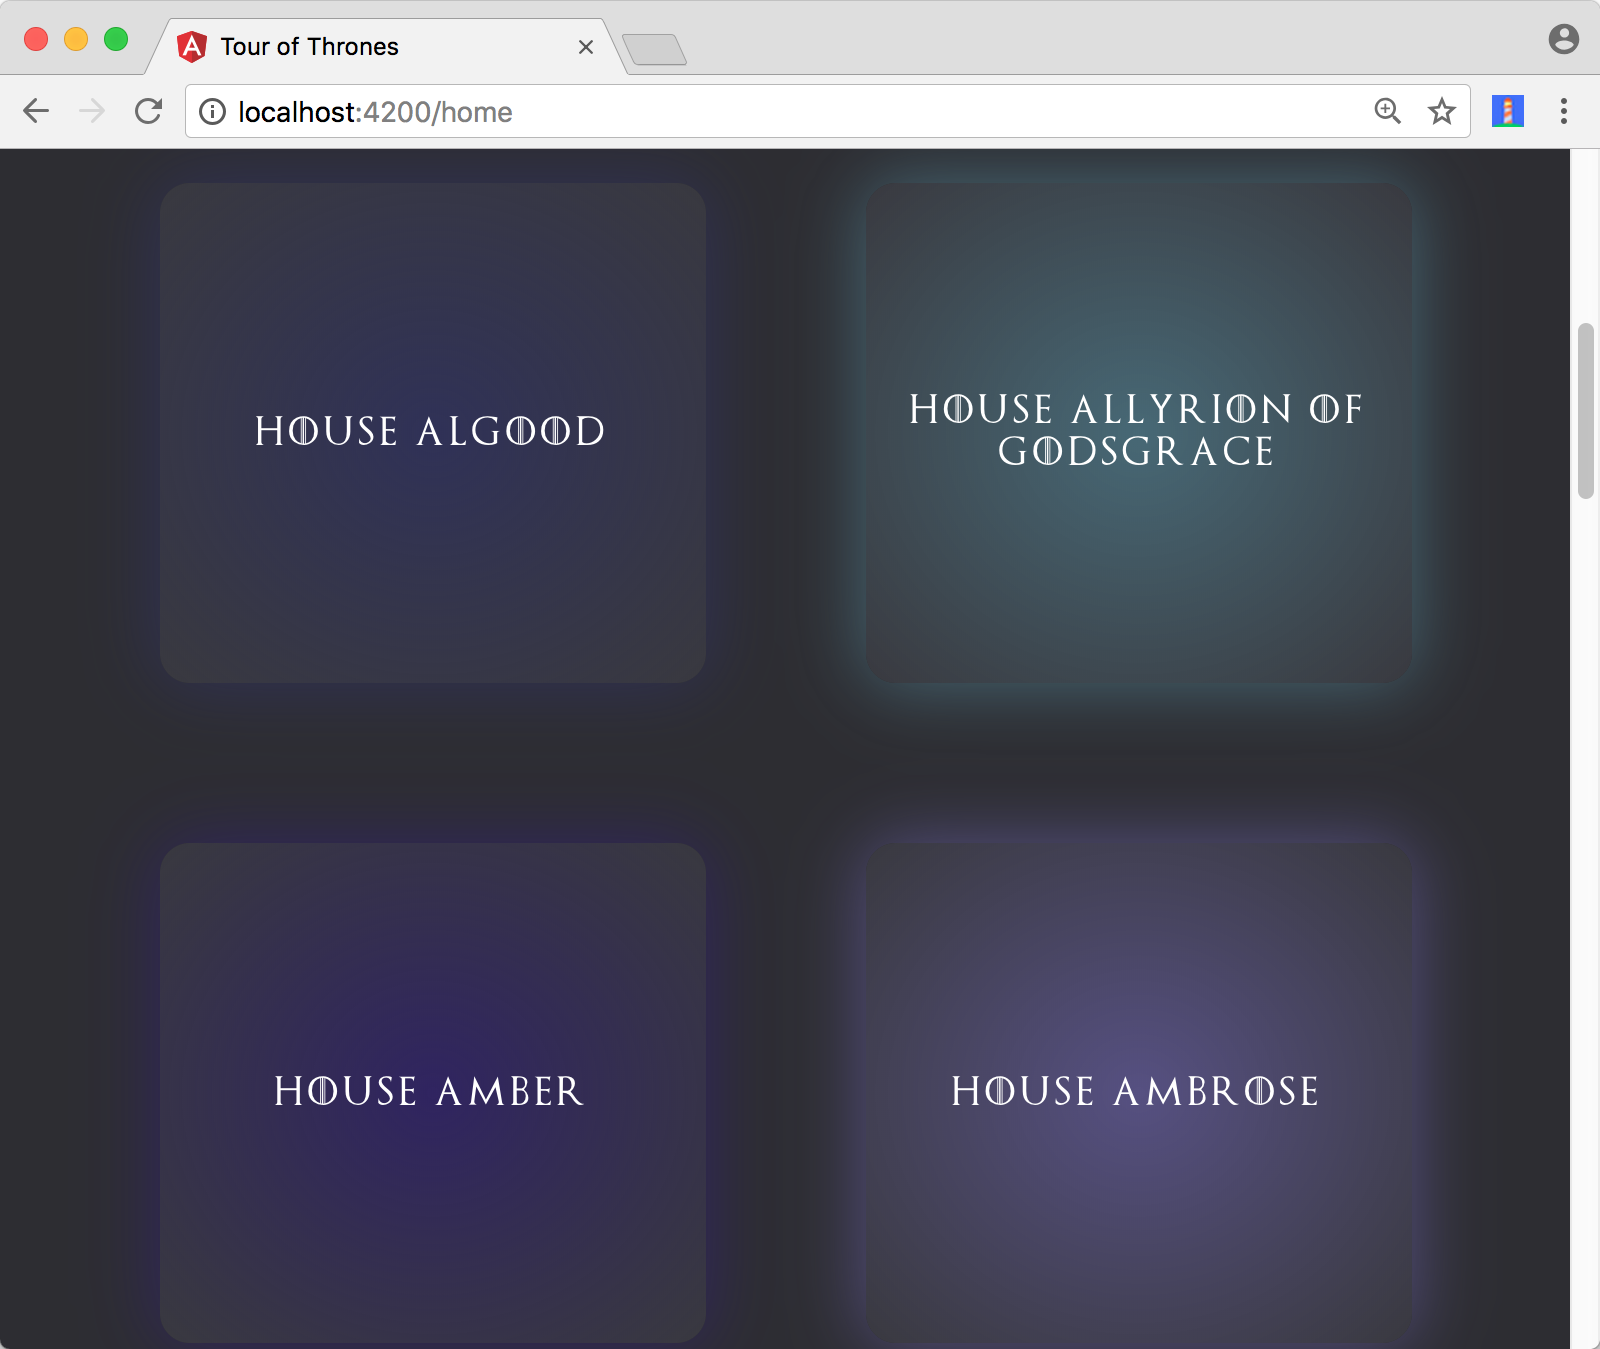
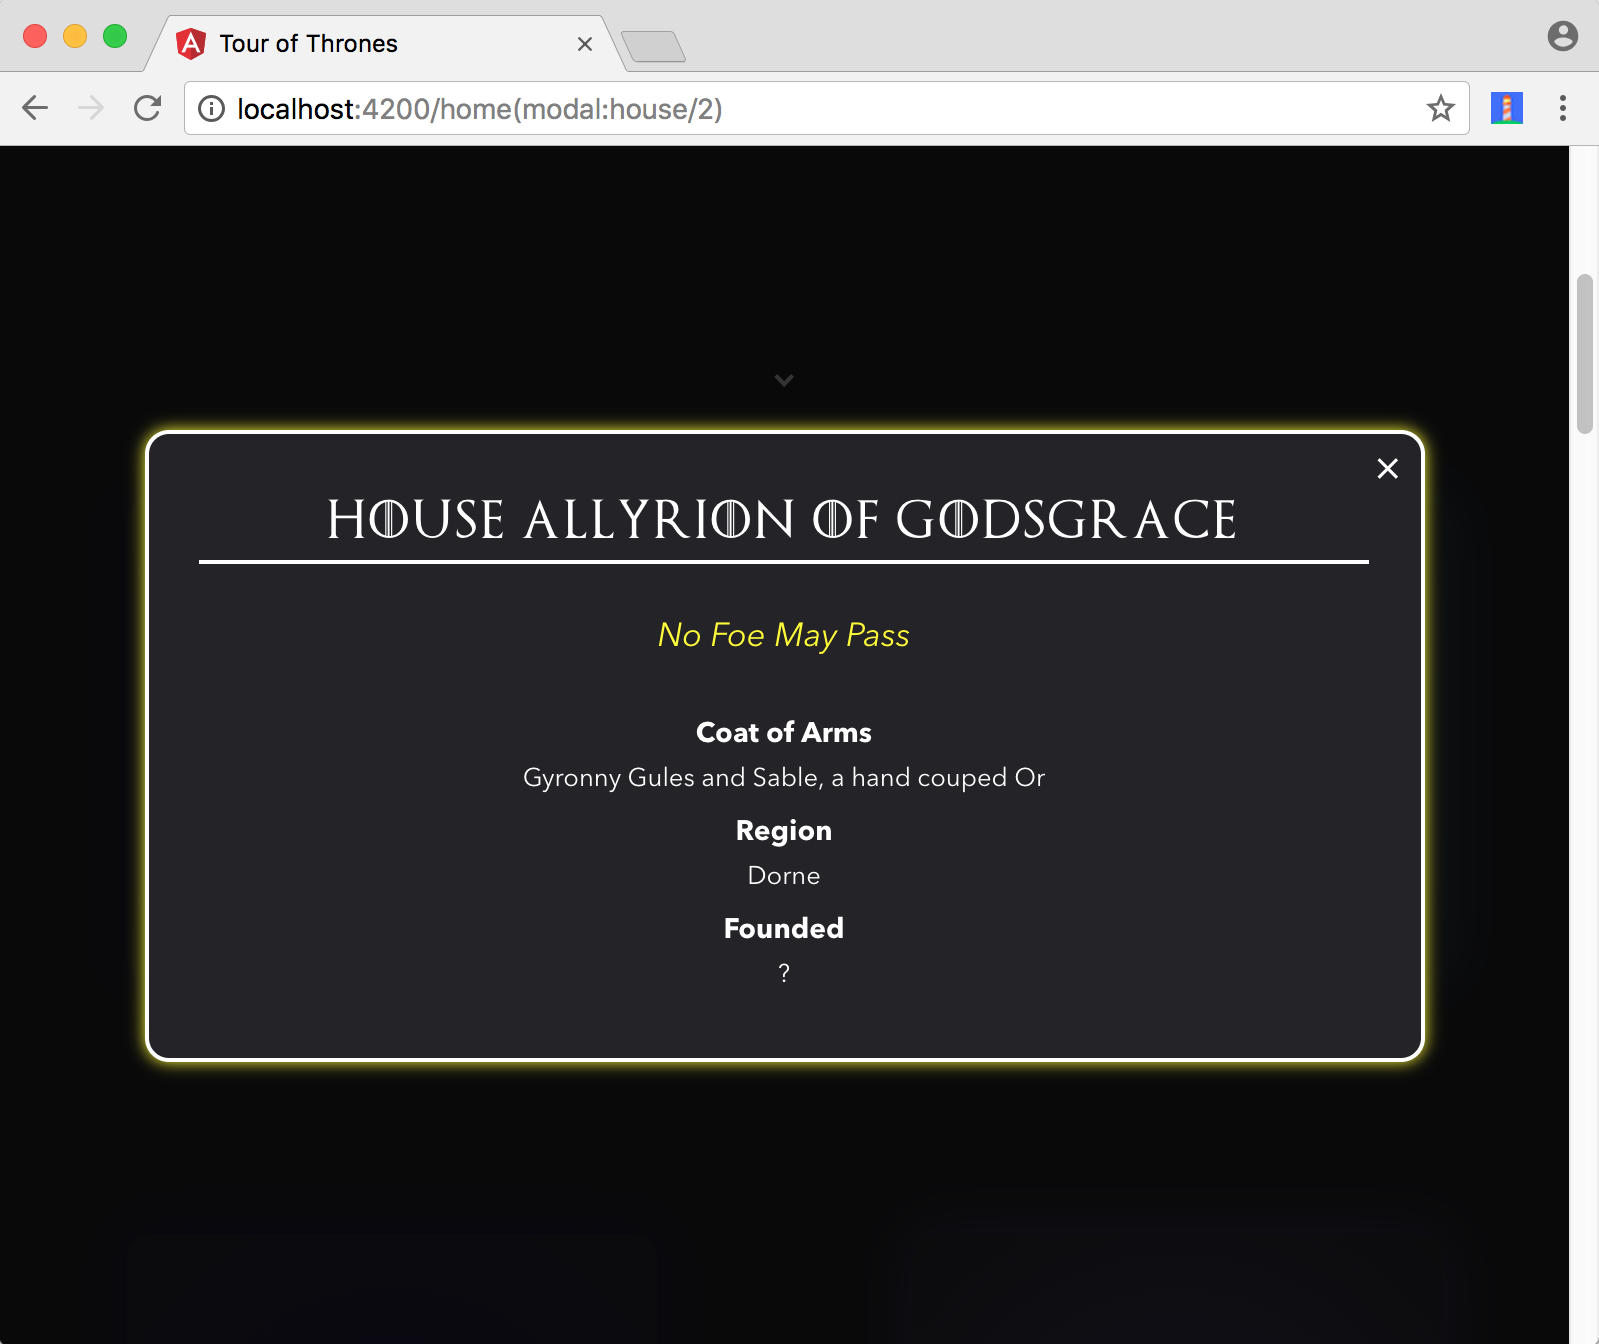
The application will consist of two parts:
- A base
homeroute that lists all the Game of Thrones houses.
- A secondary
houseroute that shows information for a particular house in a modal.
First Component
Building the first few components in the application is a good way to kick things off. We’ll start with the HeaderComponent responsible for showing the name of the application in the home route.
Create a separate components/ directory that contains a separate header/ directory within. This sub-directory can contain all the files needed for HeaderComponent.
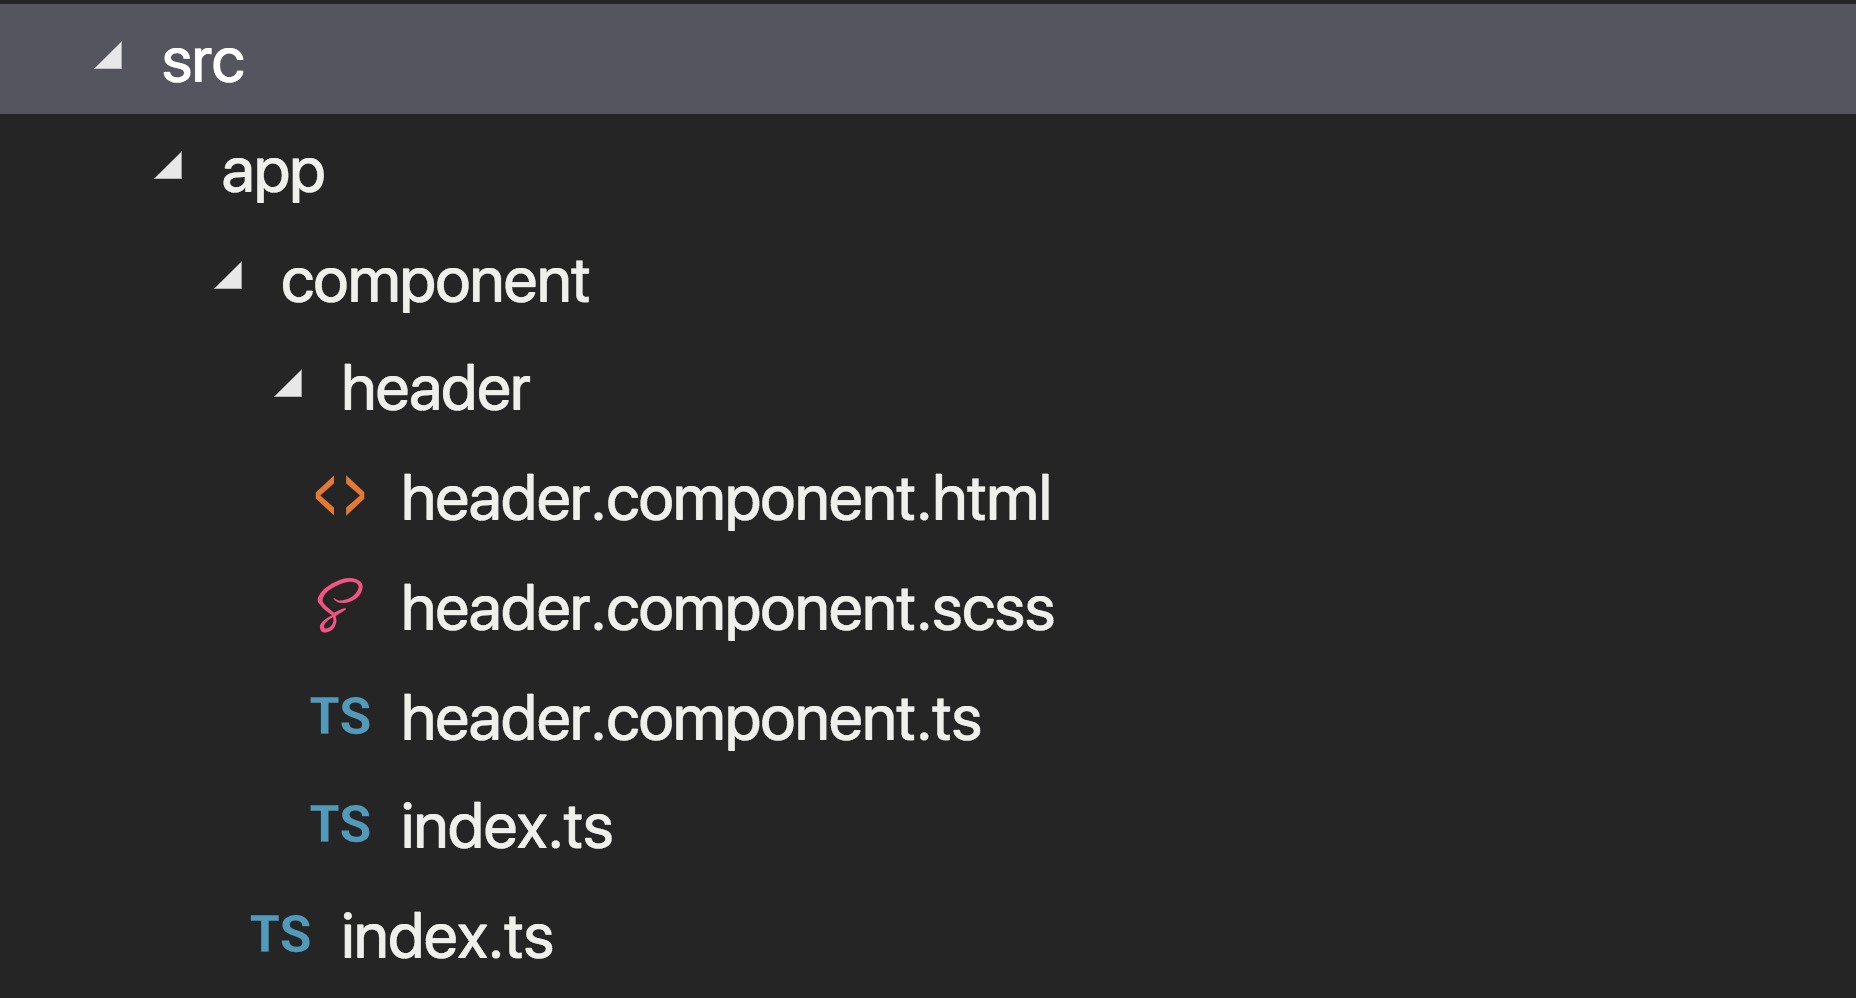
Starting with the template file, header.component.html:
<!-- src/app/component/header/header.component.html -->

<div id="header">
  <div class="item"></div>
  <h1>
    Tour Of Thrones
  </h1>
  <div class="item">
    <i class="arrow down"></i>
  </div>
</div>
Now update the also newly created header.component.ts file:
// src/app/component/header/header.component.ts

import { Component } from '@angular/core';

@Component({
  selector: 'app-header',
  templateUrl: './header.component.html',
  styleUrls: ['./header.component.scss'],
})
export class HeaderComponent {}
You can copy and paste the styles for header.component.scss from here. We’ll do this for all the styles in the application.
To simplify how components are imported throughout the app, you can use named exports in the same directory for each component with an index.ts file. Since header/ is the only component directory we currently have, exporting within the index.ts file that lives in the folder:
// src/app/component/header/index.ts

export { HeaderComponent } from './header.component';
Similarly, you can re-export these components one level higher in an index.ts file within the components/ directory:
// src/app/component/index.ts

export { HeaderComponent } from './header';
By default, Angular CLI allows you to import using absolute imports (import ComponentA from 'src/app/component'). Since all of the files live within the app directory here, you can modify baseUrl in tsconfig.json to import directly from app and not src/app:
  // tsconfig.json

  {
    "compileOnSave": false,
    "compilerOptions": {
      "baseUrl": "./",
      "baseUrl": "src",
      // ...
    }
  }
The only component (app.component.ts) and module (app.module.ts) scaffolded when the project was created live inside of src/app. You’ll need to modify AppComponent to include HeaderComponent:
<!-- src/app/app.component.html -->

<div id="app">
  <app-header></app-header>
</div>
You can see the styling in app.component.scss here.
You also have to make sure it’s declared in AppModule:
// src/app/app.module.ts

import { BrowserModule } from '@angular/platform-browser';
import { NgModule } from '@angular/core';

import { HeaderComponent } from 'app/component';
import { AppComponent } from './app.component';

@NgModule({
  declarations: [AppComponent, HeaderComponent],
  imports: [BrowserModule],
  providers: [],
  bootstrap: [AppComponent],
})
export class AppModule {}
The last thing you’ll need to do here is to add some global styles to the application (which includes the Thrones-style font). All global styles in an Angular app go to styles.scss at the root of the src/ directory. Take a look here to copy over the styles directly.
Try it out
If you run the application, you’ll notice that the header component renders and takes up a little more than half the screen.

Base Route
Now that you’ve got your feet wet building the first component, let’s move on to building everything necessary for the base /home route. We’ll need:
- A card component to display the information of each house
- A routing system in place to define a
/homeroute - A service to interface with our external API
We’ll start with CardComponent. Similarly, create a card/ subdirectory within components/ with all of its files:
<!-- src/app/component/card/card.component.html -->

<div (click)="onClick()" class="card grow" [ngStyle]="setBackgroundStyle()">
  <h3>{{name}}</h3>
</div>
// src/app/component/card/card.component.ts
import { Component, Input, Output, EventEmitter } from '@angular/core';
@Component({
selector: 'app-card',
templateUrl: './card.component.html',
styleUrls: ['./card.component.scss'],
})
export class CardComponent {
@Input() id: Number;
@Input() name: string;
@Input() color: string;
@Output() click = new EventEmitter<any>();
onClick() {
this.click.emit({
id: this.id,
});
}
setBackgroundStyle() {
return {
background: `radial-gradient(${this.color}, #39393f)`,
'box-shadow': `0 0 60px ${this.color}`,
};
}
}// src/app/component/card/index.ts
export { CardComponent } from './card.component';Finally, you’ll need to update the top-level barrel file:
// src/app/component/index.ts

export { CardComponent } from './card';
export { HeaderComponent } from './header';- Input binding is used to pass an
idparameter (the house ID) as well the house name and color. The color isn’t fetched from the API, but is randomly generated to add a little spicyness 🌶 to the app. You’ll see this in a bit. ngStyleis used to addbox-shadowandbackgroundCSS properties using this color.- An
EventEmitteris used to fire a click event to a parent component. We pass the houseidinto this event as well.
The styles for the card component can be found here. Lastly, you’ll need to declare this component in AppModule in order to use it:
// src/app/app.module.ts

// ...

import { HeaderComponent, CardComponent } from 'app/component';

@NgModule({
  declarations: [AppComponent, HeaderComponent, CardComponent],
  // ...
})
// ...
Try it out
Let’s add a couple of dummy card components to AppComponent to see if they’re displaying correctly:
<!-- src/app/app.component.html -->

<div id="app">
  <app-header></app-header>
  <app-card id="1" name="House Freshness" color="green"></app-card>
  <app-card id="2" name="House Homes" color="red"></app-card>
  <app-card id="3" name="House Juice" color="orange"></app-card>
  <app-card id="4" name="House Replay" color="blue"></app-card>
</div>
Cards are being rendered! They don’t have any specific widths/heights assigned to them and they take the shape of their parent container, which is expected. Once we add the home route next, we’ll use CSS grid to give our cards some structure.
Routing
It’s time to begin adding some navigation to the application. Instead of placing components that make up the routes in the component/ directory, we’ll put them in a separate directory called scene/.
Create a separate scene/ directory with a home/ subdirectory. Add all the files for HomeComponent responsible for the initial route can be added here:
<!-- src/app/scene/home/home.component.html -->

<div class="grid">
  <app-card
    *ngFor="let house of houses"
    [id]="house.id"
    [name]="house.name"
    [color]="house.color">
  </app-card>
</div>
<!-- src/app/scene/home/home.component.ts -->
import { Component, OnInit } from '@angular/core';
@Component({
selector: 'app-home',
templateUrl: './home.component.html',
styleUrls: ['./home.component.scss'],
})
export class HomeComponent implements OnInit {
houses = [];
constructor() {}
ngOnInit() {
this.getHouses();
}
getHouses() {
this.houses = [
{id: 1, name: 'House Freshness', color: 'green'},
{id: 2, name: 'House Homes', color: 'red'},
{id: 3, name: 'House Juice', color: 'orange'},
{id: 4, name: 'House Replay', color: 'blue'},
];
}
}// src/app/scene/home/index.ts
export { HomeComponent } from './home.component';// src/app/scene/index.ts
export { HomeComponent } from './home';The styles for this component can be found here. If you take a look at the styles, you’ll notice that the list of cards is wrapped in a grid structure.
Now let’s define the routes in AppModule:
// src/app/app.module.ts

import { BrowserModule } from '@angular/platform-browser';
import { NgModule } from '@angular/core';
import { Routes, RouterModule } from '@angular/router';

import { HeaderComponent, CardComponent } from 'app/component';
import { HomeComponent } from 'app/scene';
import { AppComponent } from './app.component';

const routePaths: Routes = [
  {
    path: '',
    redirectTo: 'home',
    pathMatch: 'full',
  },
  {
    path: 'home',
    component: HomeComponent,
  },
];

@NgModule({
  declarations: [AppComponent, HeaderComponent, CardComponent, HomeComponent],
  imports: [BrowserModule, RouterModule.forRoot(routePaths)],
  providers: [],
  bootstrap: [AppComponent],
})
export class AppModule {}
We’ve defined a single route path (home) that maps to a component (HomeComponent) and we’ve set up the root path to redirect to this. You now need to let the application know where to dynamically load the correct component based on the current route, and you can do that by using router-outlet:
<!-- src/app/app.component.html -->

<div id="app">
  <app-header></app-header>
  <router-outlet></router-outlet>
</div>
Try it out
Take a look at the application now. You’ll see HomeComponent showing the list of houses in a grid structure.
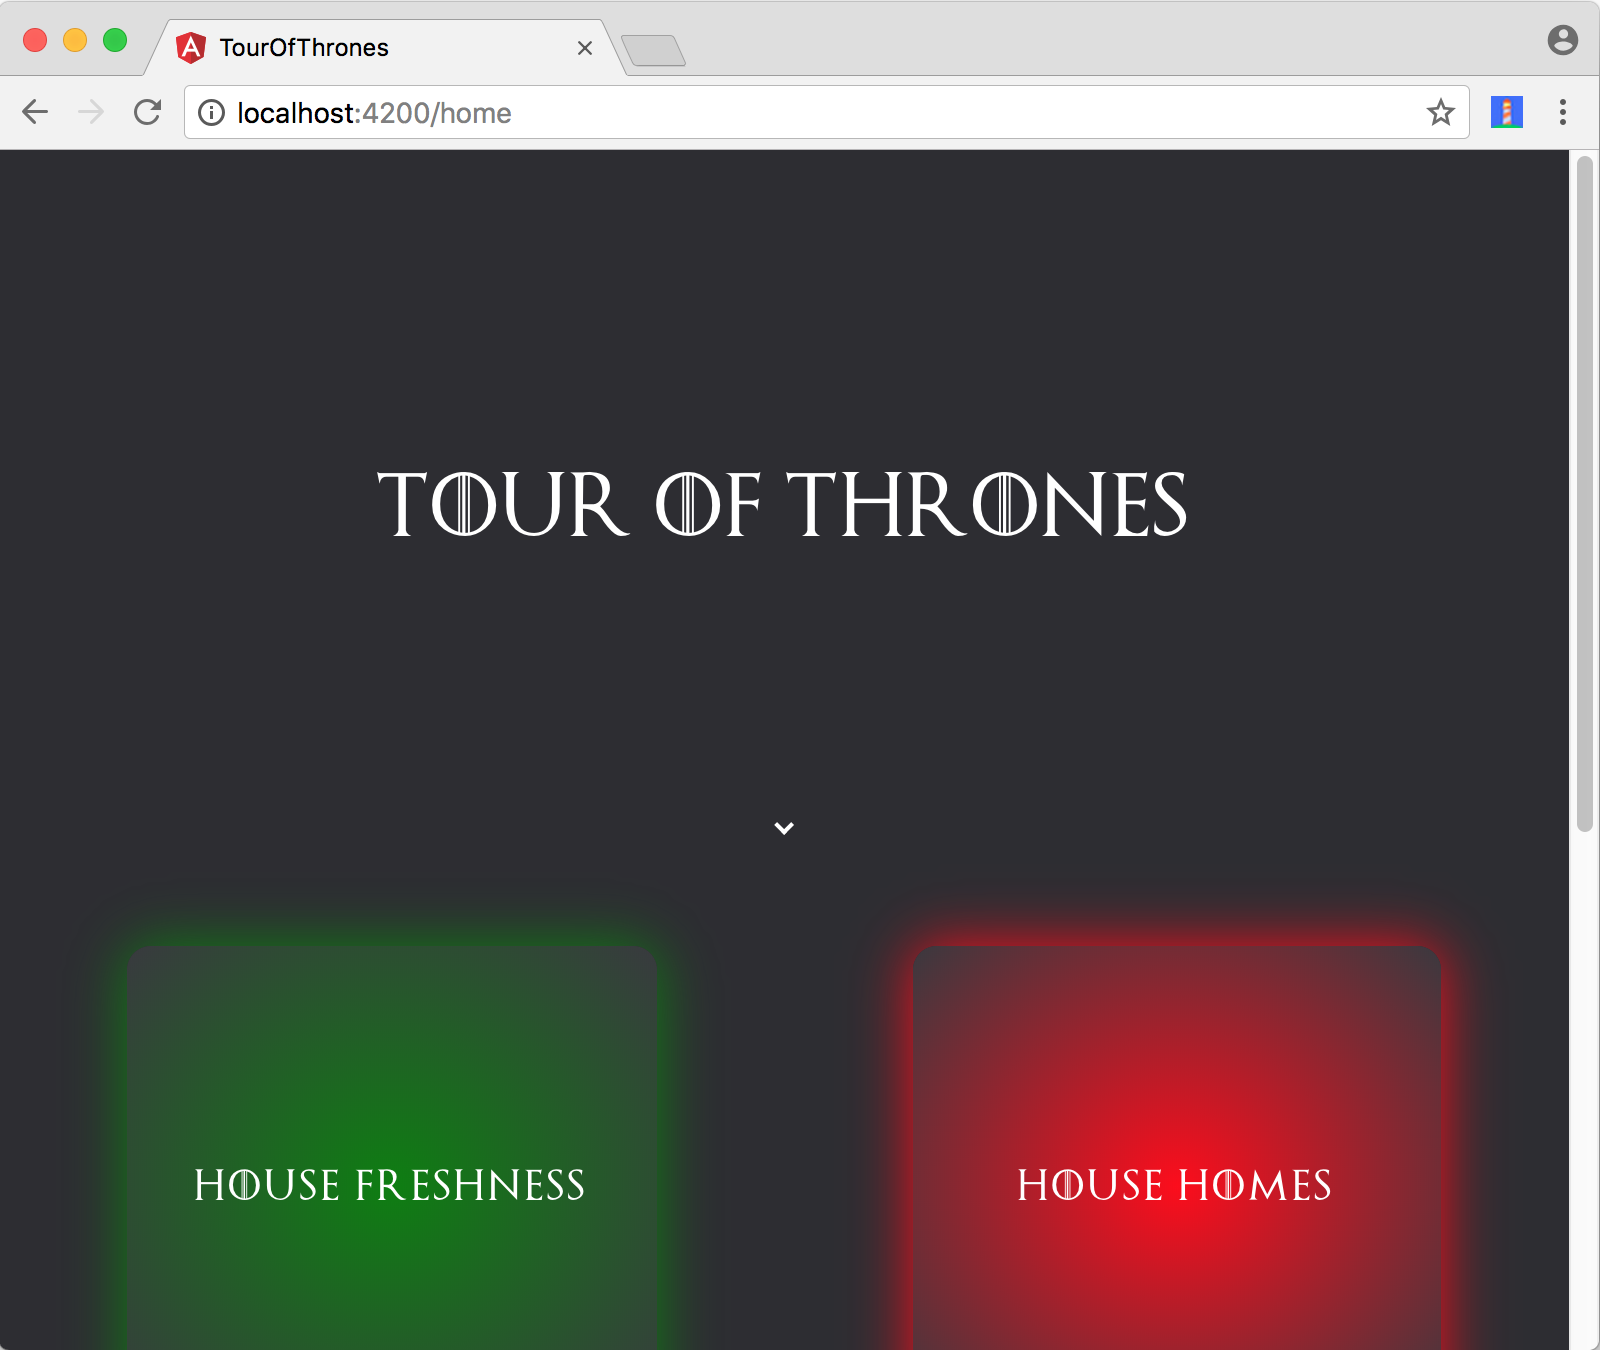
You can also see that loading the base URL of the application immediately redirects to /home.
Service
To get some real data, we need to interface with the API. Create a service for this by placing it in a /service directory:
// src/app/service/iceandfire.service.ts

import { Injectable } from '@angular/core';
import { HttpClient } from '@angular/common/http';
import { Observable } from 'rxjs';
import { map, filter, scan } from 'rxjs/operators';

import { House } from 'app/type';

@Injectable()
export class IceAndFireService {
  baseUrl: string;

  constructor(private http: HttpClient) {
    this.baseUrl = 'https://anapioficeandfire.com/api';
  }

  fetchHouses(page = 1) {
    return this.http.get<House[]>(`${this.baseUrl}/houses?page=${page}`);
  }

  fetchHouse(id: number) {
    return this.http.get<House>(`${this.baseUrl}/houses/${id}`);
  }
}
We’re using Angular’s HttpClient to interface with the API by defining two separate methods:
fetchHouses: Get a list of houses given a page numberfetchHouse: Get information about a particular house
We’ll also wrap our service in its own module:
// src/app/service/service.module.ts

import { NgModule } from '@angular/core';
import { IceAndFireService } from './iceandfire.service';

@NgModule({
  imports: [],
  exports: [],
  declarations: [],
  providers: [],
})
export class ServicesModule {
  static forRoot() {
    return {
      ngModule: ServicesModule,
      providers: [IceAndFireService],
    };
  }
}

export { IceAndFireService };
// src/app/service/index.ts
export { IceAndFireService } from './iceandfire.service';
export { ServicesModule } from './service.module';In the service, we type-check with a House interface. You can add the types and interfaces to a type/ directory:
// src/app/type/house.ts
type Url = string;

export interface House {
  id: number;
  url: Url;
  name: string;
  region: string;
  coatOfArms: string;
  words: string;
  titles: string[];
  seats: string[];
  currentLord: string;
  heir: string;
  overlord: Url;
  founded: string;
  founder: string;
  diedOut: string;
  ancestralWeapons: string[];
  cadetBranches: Url[];
  swornMembers: Url[];
  color: string;
}
// src/app/type/index.ts
export { House } from './house';Now import the services module in AppModule:
// src/app/app.module.ts

//...
import { HttpClientModule } from '@angular/common/http';
import { ServicesModule } from 'app/service';
//...

@NgModule({
  //...
  imports: [
    //...
    HttpClientModule,
    ServicesModule.forRoot(),
  ],
  //...
})
export class AppModule {}
You can now update HomeComponent to use the appropriate service method:
// src/app/scene/home/home.component.ts

import { Component, OnInit } from '@angular/core';

import { IceAndFireService } from 'app/service';
import { House } from 'app/type';

@Component({
  selector: 'app-home',
  templateUrl: './home.component.html',
  styleUrls: ['./home.component.scss'],
})
export class HomeComponent implements OnInit {
  pageNum = 1;
  houses: House[] = [];

  constructor(private service: IceAndFireService) {}

  ngOnInit() {
    this.getHouses();
  }

  getHouses() {
    this.houses = [
      {id: 1, name: 'House Freshness', color: 'green'},
      {id: 2, name: 'House Homes', color: 'red'},
      {id: 3, name: 'House Juice', color: 'orange'},
      {id: 4, name: 'House Replay', color: 'blue'},
    ];
  }

  getHouses(pageNum = 1) {
    this.service.fetchHouses(pageNum).subscribe(
      data => {
        this.houses = this.houses.concat(
          data.map(datum => {
            const urlSplit = datum.url.split('/');

            return {
              ...datum,
              id: Number(urlSplit[urlSplit.length - 1]),
              color: getColor(),
            };
          }),
        );
      },
      err => console.error(err),
    );
  }
}

// utils
const getColor = () =>
  `#${Math.random()
    .toString(16)
    .slice(-6)}66`;
Let’s quickly go over what’s happening here:
- We’re importing
IceAndFireServiceand injecting it into the component constructor - We’re using the
OnInitlifecycle hook to fire thegetHousesclass method as soon as our component finishes initializing - In the service,
this.http.getreturns an observable. In the component, thegetHousesmethod calls thefetchHousesmethod and subscribes to the observable returned. Since the API does not have a specific ID attribute for each object, we’re mapping through the response and obtaining the ID from the URL attribute as well as assigning a color to each house. - At the end, we have
getColor. This is a tiny utility method that returns a color that gets assign for each house. This isn’t exactly random, but it works for now. Also the two digits at the end of the string,66, represent alpha transparency.
Try it out
If you take a look at the application now, you’ll see the first page of houses rendered as soon as you load the application:

Lazy Loading
To improve loading times on a web page, we can try to lazy load non-critical resources where possible. In other words, we can defer the loading of certain assets until the user actually needs them.
In this application, we’re going to lazy load on two different user actions:
- On scroll
- On route change
Infinite scrolling
Infinite scrolling is a lazy loading technique to defer loading of future resources until the user has almost scrolled to the end of their currently visible content.
In this application, we want to be careful with how many houses we fetch over the network as soon as the page loads. Like many APIs, the one we’re using paginates responses which allows us to pass a ?page parameter to iterate over responses. We can add infinite scrolling here to defer loading of future paginated results until the user has almost scrolled to the bottom of the web page.
There is more than one way to lazy load elements that show below the edge of the device viewport:
- Using scroll event listeners
- Using Intersection Observer
For this application, we’ll use ngx-infinite-scroll, a community-built library that provides an Angular directive abstraction over changes to the scroll event. With this library, you can listen and fire callback events triggered by scroll behaviour.
npm install ngx-infinite-scroll --saveYou can now import its module into the application:
// src/app/app.module.ts

//...
import { InfiniteScrollModule } from 'ngx-infinite-scroll';
//...

@NgModule({
  imports: [
    //...
    InfiniteScrollModule,
  ],
  //...
})
export class AppModule {}
And add it to HomeComponent:
<!-- src/app/scene/home/home.component.html -->

<div class="grid" infinite-scroll (scrolled)="onScrollDown()">
  <app-card
    *ngFor="let house of houses"
    [id]="house.id"
    [name]="house.name"
    [color]="house.color"
    (click)="routeToHouse($event)">
  </app-card>
</div>
// src/app/scene/home/home.component.ts
import { Component, OnInit } from '@angular/core';
import { IceAndFireService } from 'app/service';
import { House } from 'app/type';
@Component({
selector: 'app-home',
templateUrl: './home.component.html',
styleUrls: ['./home.component.scss'],
})
export class HomeComponent implements OnInit {
//...
onScrollDown() {
this.pageNum++;
this.getHouses(this.pageNum);
}
}We just added onScrollDown as a callback for the directive scrolled method. In here, we increment the page number and call the getHouses method.
Now if you try running the application, you’ll see houses load as you scroll down the page.
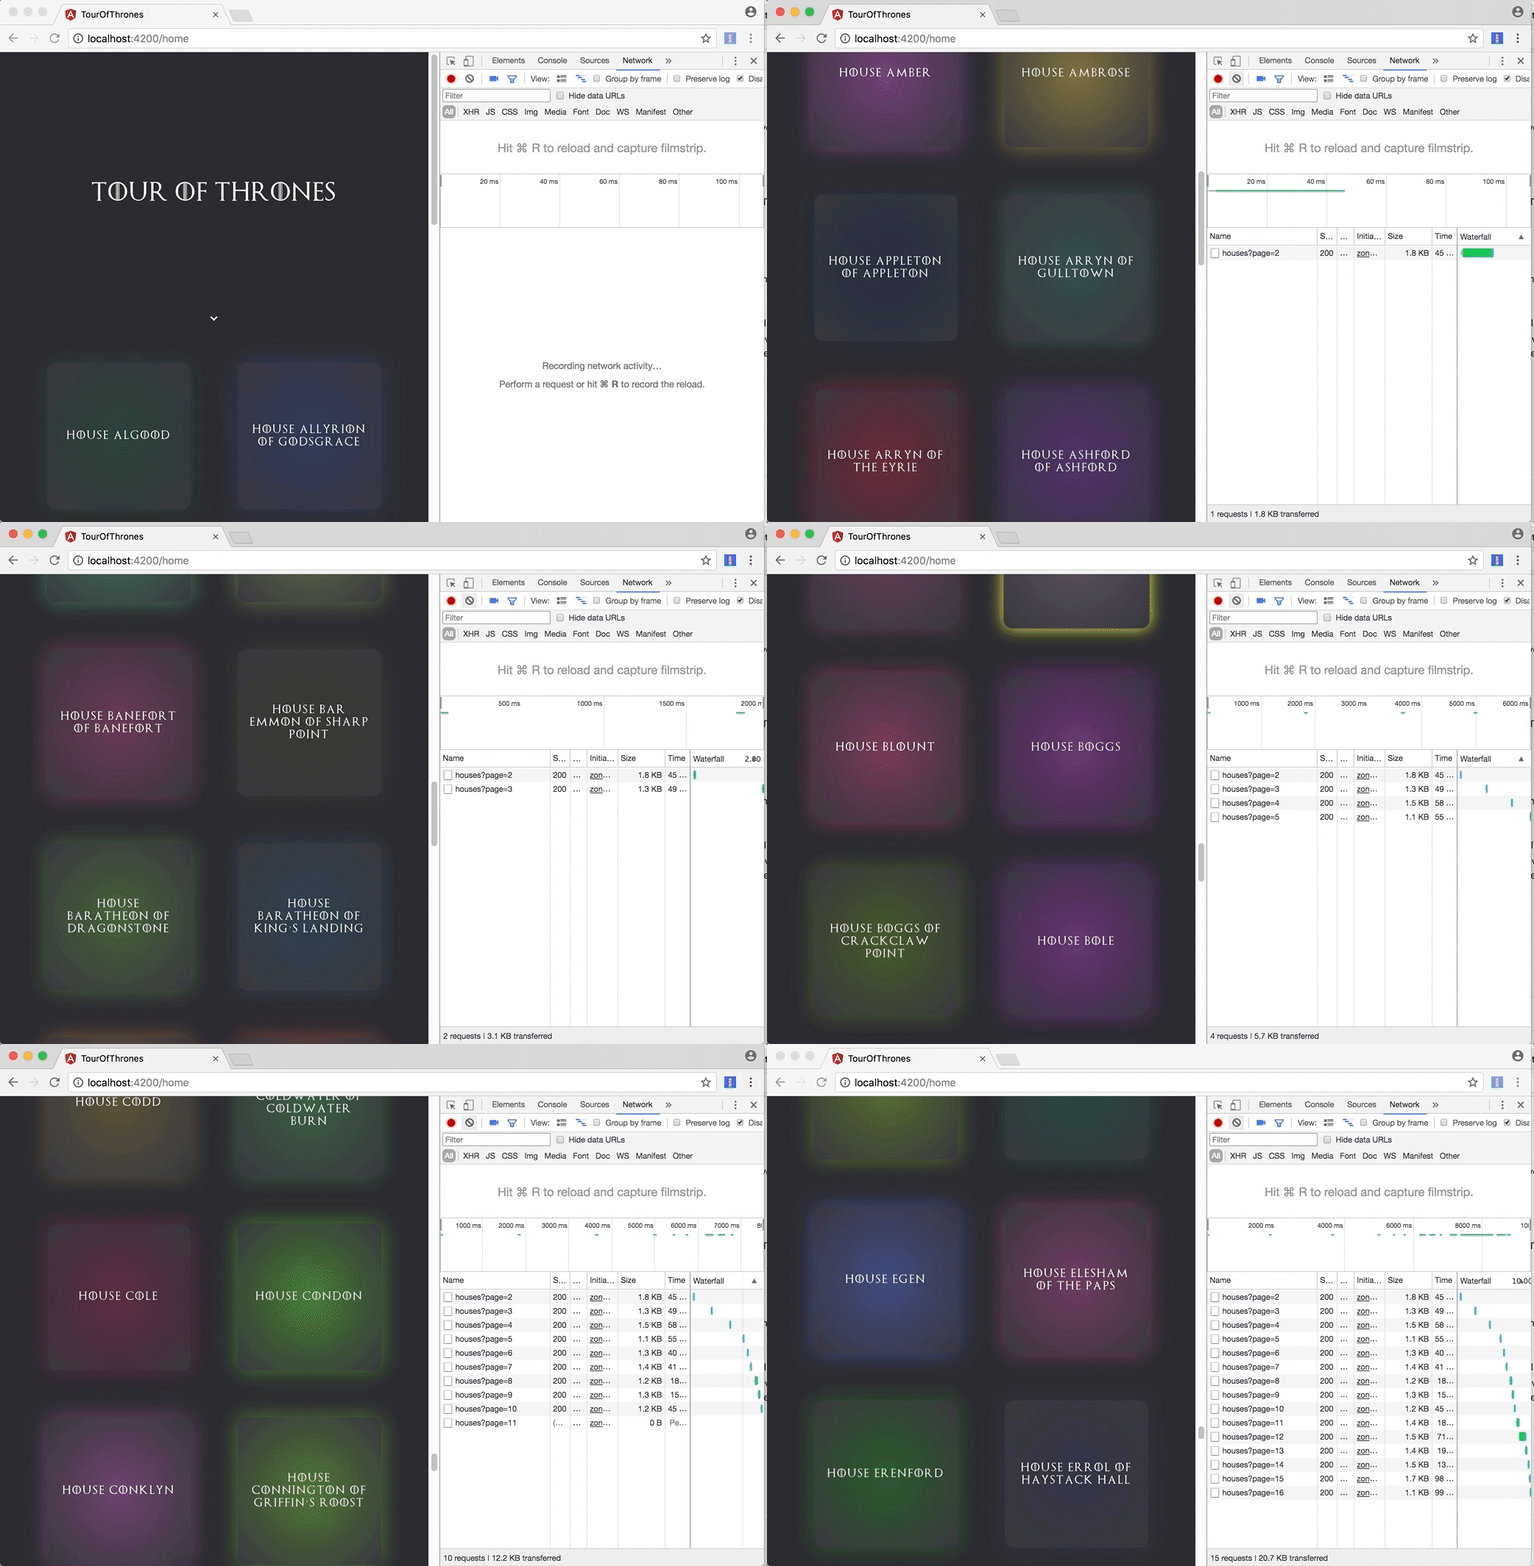
The library allows users to customize a number of attributes such as modifying the distance of the current scroll location with respect to the end of the container that determines when to fire an event. You can refer to the README for more information.
When should we lazy load on scroll?
There are countless ways to organize a paginated list of results in an application like this, and an infinitely long list is definitely not the best way. Many social media platforms (such as Twitter) use this model to keep users engaged, but it is not suitable for when the user needs to find a specific piece of information quickly.
In this application for example, it would take a user a very long time to find information about a particular house. Adding normal pagination, allowing the user to filter by region or name, or allowing them to search for a particular house are all probably better ways of doing this.
Instead of trying to lazy load all the content that is displayed to the user as they scroll (i.e. infinite scroll), it might be more worthwhile to try and defer loading of certain elements that aren’t immediately visible to users on page load. Elements such as images and video can consume significant amounts of user bandwidth and lazy loading them specifically will not necessarily affect the entire paginated flow of the application.
How should we lazy load on scroll?
Finding a library that makes it easier to lazy load elements but uses scroll event listeners is a start. If possible however, try to find a solution that relies on IntersectionObserver but also provides a polyfill for browsers that do not yet support it. Here’s a handy article that shows you how to create an Angular directive with IntersectionObserver.
Code splitting
Code splitting refers to the practice of splitting the application bundle into separate chunks that can be lazy loaded on demand. In other words, instead of providing users with all the code that makes up the application when they load the very first page, you can give them pieces of the bundle as they navigate throughout the app.
You can apply code splitting in different ways, but it commonly happens on the route level. Webpack, the module bundler used by Angular CLI, has code splitting built-in. Without needing to dive in to the internals of our Webpack configurations in order to make this work, Angular router allows you to lazy-load any feature module that you build.
Let’s see this in action by building our next route, /house, which shows information for a single house:
<!-- src/app/scene/house/house.component.html -->

<app-modal (modalClose)="modalClose()">
  <div modal-loader *ngIf="!house; else houseContent" class="loader-container">
    <app-loader></app-loader>
  </div>
  <ng-template #houseContent modal-content>
    <div class="container">
      <h1>{{house.name}}</h1>
      <div *ngIf="house.words !== ''" class="subheading">{{house.words}}</div>
      <div class="info" [ngClass]="(house.words === '') ? 'info-large-margin' : 'info-small-margin'">
        <div class="detail">
          <p class="caption">Coat of Arms</p>
          <p class="body">{{house.coatOfArms === '' ? '?' : house.coatOfArms}}</p>
        </div>
        <div class="detail">
          <p class="caption">Region</p>
          <p class="body">{{house.region === '' ? '?' : house.region}}</p>
        </div>
        <div class="detail">
          <p class="caption">Founded</p>
          <p class="body">{{house.founded === '' ? '?' : house.founded}}</p>
        </div>
      </div>
    </div>
  </ng-template>
</app-modal>
The HouseComponent shows a number of details for the house selected. It is rendered within a modal and for that reason, its contents are wrapped within an <app-modal> component. We’re not going to into too much detail on how this modal component files are written, but you can find them here.
One important thing to mention is that we’re using projection (ng-content) to project content into our modal. We either project a loading state (modal-loader) if we don’t have any house information yet or modal content (modal-content) if we do. You can find the code that makes up our loader here.
Although we’re only using our modal wrapper for a single component in this application, projection is used to make it more reusable. This can be useful if we happen to need to use a modal in any other part of the application.
Unlike the HomeComponent which is being bundled directly with the root AppModule, you can create a separate feature module for HouseComponent that can be lazy loaded:
// src/app/scene/house/house.module.ts

import { NgModule } from '@angular/core';
import { CommonModule } from '@angular/common';
import { RouterModule, Routes } from '@angular/router';

import { ModalComponent, LoaderComponent } from 'app/component';

import { HouseComponent } from './house.component';

const routes: Routes = [
  {
    path: '',
    component: HouseComponent,
  },
];

@NgModule({
  imports: [CommonModule, RouterModule, RouterModule.forChild(routes)],
  declarations: [HouseComponent, ModalComponent, LoaderComponent],
  exports: [HouseComponent, RouterModule],
})
export class HouseModule {}
Now let’s move on to the logic behind this component:
// src/app/scene/house/house.component.ts

import { Component, OnInit } from '@angular/core';
import { Router, ActivatedRoute } from '@angular/router';

import { IceAndFireService } from 'app/service';
import { House } from 'app/type';

@Component({
  selector: 'app-house',
  templateUrl: './house.component.html',
  styleUrls: ['./house.component.scss'],
})
export class HouseComponent implements OnInit {
  house: House;

  constructor(
    private service: IceAndFireService,
    private router: Router,
    private route: ActivatedRoute,
  ) {}

  ngOnInit() {
    this.route.params.subscribe(params => {
      this.service
        .fetchHouse(+params['id'])
        .subscribe(data => (this.house = data), err => console.error(err));
    });
  }

  modalClose() {
    this.router.navigate([{ outlets: { modal: null } }]);
  }
}
In here, we subscribe to our route parameters after the component finishes initializing in order to obtain the house ID. We then fire an API call to fetch its information.
We also have a modalClose method that navigates to a modal outlet with a value of null. We do this to clear our modal’s secondary route.
Secondary routes
In Angular, we can create any number of named router outlets in order to create secondary routes. This can be useful to separate different parts of the application in terms of router configurations that don’t need to fit into the primary router outlet. A good example of using this is for a modal or popup.
Let’s begin by defining the second router outlet:
<!-- src/app/app.component.html -->

<div id="app">
  <app-header></app-header>
  <router-outlet></router-outlet>
  <router-outlet name="modal"></router-outlet>
</div>
Unlike the primary router outlet, secondary outlets must be named. For this example, we’ve named it modal.
Now add HomeModule into the top-level route configurations while lazy loading it. This can be done by using a loadChildren attribute:
// src/app/app.module.ts

//....

const routePaths: Routes = [
  {
    path: '',
    redirectTo: 'home',
    pathMatch: 'full',
  },
  {
    path: 'home',
    component: HomeComponent,
  },
  {
    path: 'house/:id',
    outlet: 'modal',
    loadChildren: 'app/scene/house/house.module#HouseModule',
  },
];

@NgModule({
  //...
})
export class AppModule {}
Although using a loadChildren attribute with a value of the path to the module would normally work, there’s an open issue about a bug that occurs while lazy loading a module tied to a named outlet (secondary route).
In the same issue thread, somebody suggests a workaround that involves adding a route proxy component in between:
// src/app/app.module.ts

import {
  //...
  RouteProxyComponent,
} from 'app/component';

//...

const routePaths: Routes = [
  {
    path: '',
    redirectTo: 'home',
    pathMatch: 'full',
  },
  {
    path: 'home',
    component: HomeComponent,
  },
  {
    path: 'house/:id',
    outlet: 'modal',
    component: RouteProxyComponent,
    children: [
      {
        path: '',
        loadChildren: 'app/scene/house/house.module#HouseModule',
      },
    ],
  },
];

@NgModule({
  //...
  declarations: [
    RouteProxyComponent,
  ],
  //...
})
export class AppModule {}
This workaround works for now, but it does add an extra component layer in between. You can see how the RouteProxyComponent is nothing more than a single router outlet here.
The last thing you’ll need to do is allow the user to switch routes when a house is clicked:
// src/scene/home/home.component.ts

import { Router } from '@angular/router';

//...

export class HomeComponent implements OnInit {
  //...

  constructor(private service: IceAndFireService, private router: Router) {}

  //...

  routeToHouse(event: { id: number }) {
    if (event.id) {
      this.router.navigate([{ outlets: { modal: ['house', event.id] } }]);
    }
  }

  //...
}
A routeToHouse method that navigates to a modal outlet with an array for link parameters was added here. Since HouseComponent looks up the ID of the house in our route parameters, we’ve included it here in the array.
Now add a click handler to bind to this event:
<!-- src/scene/home/home.component.html -->

<div class="grid" infinite-scroll (scrolled)="onScrollDown()">
  <app-card
    *ngFor="let house of houses"
    [id]="house.id"
    [name]="house.name"
    [color]="house.color"
    (click)="routeToHouse($event)">
  </app-card>
</div>
Try it out
Load the application with these changes and click on any house.
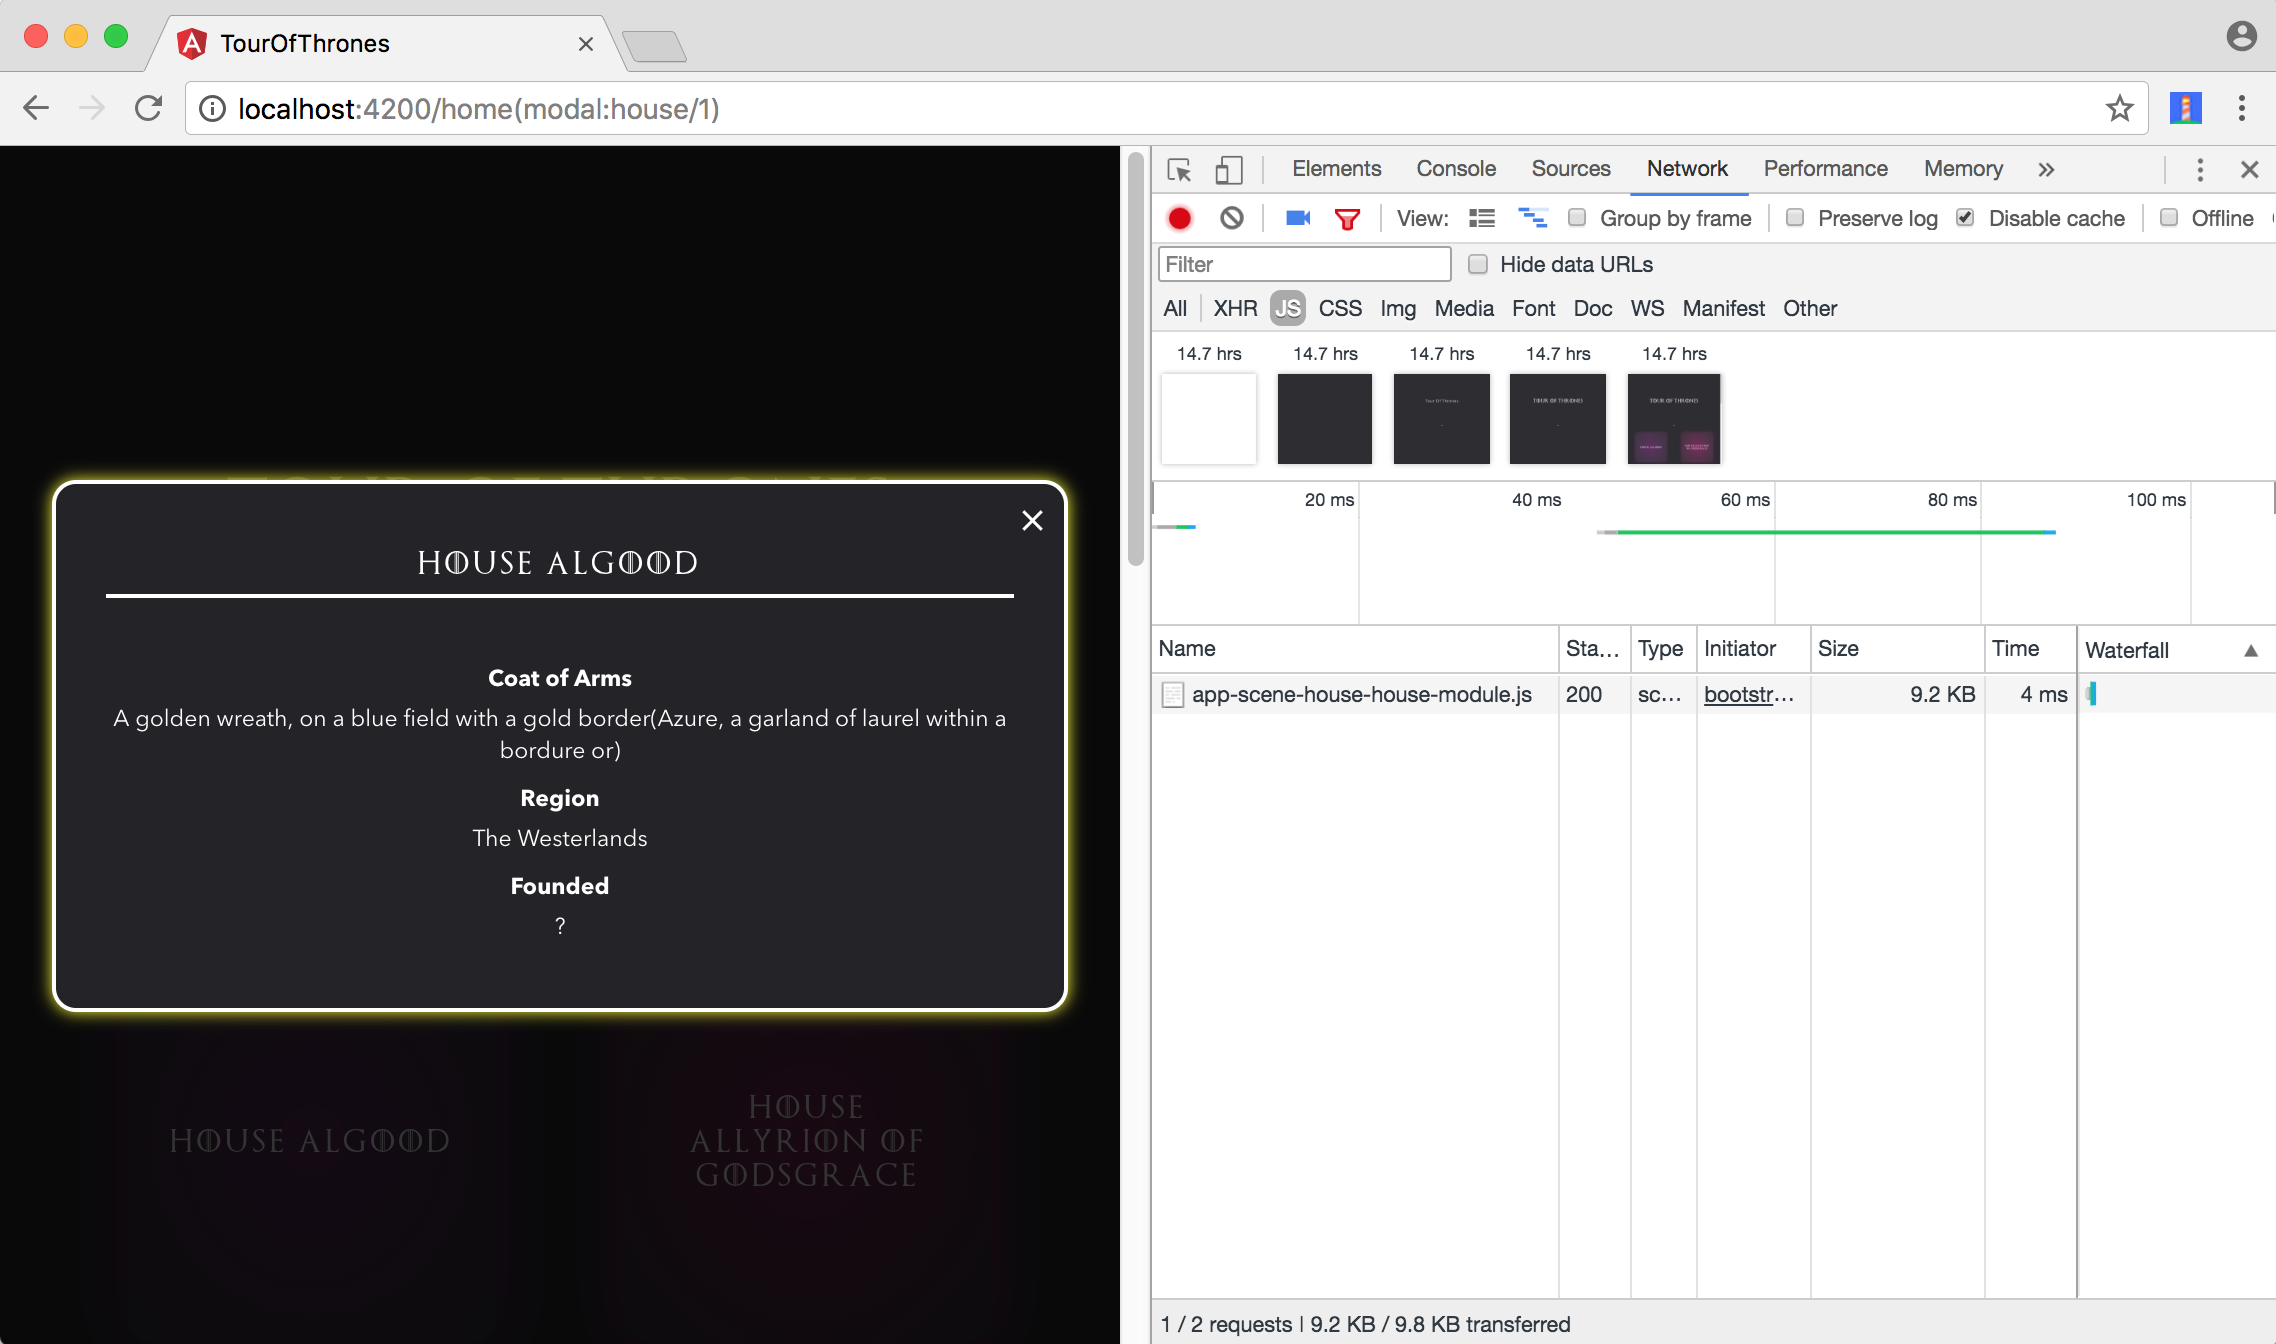
If you have the Network tab of your browser’s developer tools open, you’ll notice that the code that makes up the house module is only loaded when you click on a house.
When should we code split?
It depends. In this example, the code that makes up the lazy loaded feature module is less than 3KB minified + gzipped (on a production build). If you think this does not warrant code splitting, you might be right.
Lazy loading feature modules can be a lot more useful when your application starts growing with each module making up a juicy cut of the entire bundle. Many developers think code-splitting should be one of the first things to consider when trying to improve the performance of an application, and rightly so.

Building feature modules is useful to separate concerns in an Angular application. As you continue to grow your Angular app, you’ll most likely reach a point where you realize that code-splitting some modules can cut down the initial page size significantly.
Conclusion
In this article, we built an Angular 7 app from scratch as well as explored how lazy loading can be useful to optimize its performance. I was planning to also cover @angular/service-worker and how it fits into the CLI in this post, but it turned out to be a bit longer than I expected :). We’ll explore that in the next part of the series.
If you have any questions or suggestions, feel free to open an issue!